The Mantrabhaga (Trisikhibrahmanopanishad) says: Perform the Padmasana yoga by placing your right foot on your left thigh & the left foot on the right thigh. This asana will purge your body of all ailments by removing the toxins.
The Nomenclature
The nomenclature ‘Padmasana’ means ‘The Lotus Posture‘. The term is derived from the Sanskrit words ‘Padma’ meaning ‘Lotus’ and ‘Asana’ which connotes ‘Posture’.
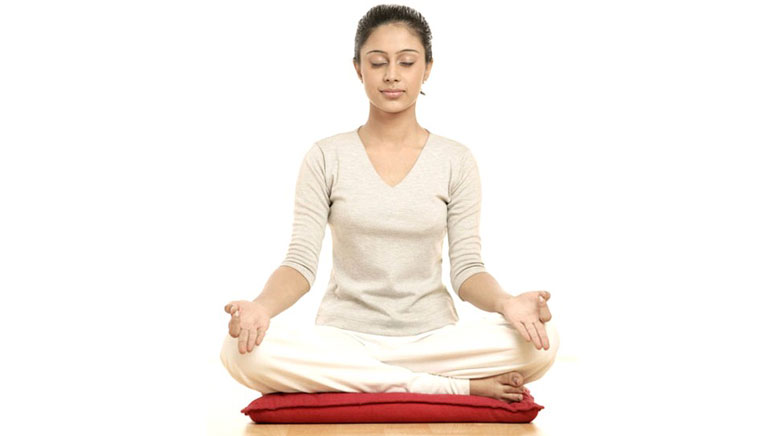
The nomenclature aptly summarizes the posture. From a distance, a person sitting in Padmasana resembles a lotus. While both the feet placed on the opposite thighs are akin to the lotus leaves, the hands placed one over the other appear like the full bloom lotus flower.
Note: Mentionably, the Padmasana yoga is also used to carry out meditation, the breathing exercises as well as the concentration boosting ones. Actually, one stage flows into the subsequent one.
Therefore, all these four stages – asana, meditation, breathing and concentration boosting – constitute a compact whole.
Importance of Padmasana yoga
- You can use the Padmasana to sit for long hours. You will benefit from sitting in this posture.
- Mastery of Padmasana makes sit easier for you to master the other asanas.
- Therefore, Padmasana is considered one of the main yogic postures.
- Mentionably, Padmasana is also used in many other asanas wherever the legs are required to be crossed.
- You can use the Padmasana to offer prayers, do meditation and also do pranayama (the breathing exercises).
- You should make it a habit to sit in Padmasana.
- Begin by sitting in this posture for just three minutes.
- Gradually increase the time up to 10 minutes or till the time you do not feel uncomfortable or experience cramps in your legs.
- You can sit in the Padmasana (Half and Full lotus postures) even while you do some of the daily works like writing watching TV, reading, or even while doing file work at home.
- If you are fat, or is not accustomed to squatting on the floor, you may not be able to do Padmasana immediately. Don’t be disheartened. You too will be able to do Padmasana with practice. Justhave patience and continue to do the Padmasana with dedication and fervor.
- What is more, you will also enjoy the benefits arising from continuous practice of Padmasana.
The Positive Mental State
- It is crucial that you think positive and believe that all your ailments are getting cured through the fresh air you are breathing in.
- During these moments, visualize that the fresh air you are inhaling and are withholding are entering the air sacs within the lungs.
- Also visualize that the oxygenated air is thoroughly cleaning the lungs and also transporting the oxygenated air into each and every point of your body including the limbs and the internal organs.
Methodology of Padmasana Yoga
- Sit down on the mat with your feet stretched in front.
- Now, gently pull the left leg. Holding the left ankle pull the left foot sideways towards the right thigh.
- Without straining the knee tendons, place the foot of the bent left leg atop the right thigh.
- Once the left feet is placed firmly over the right thigh, do the same with the right foot and place it over the left thigh.
- You’ll be squatting almost interlocked but with the difference that here the feet are atop the thighs of the opposite legs.
- The lower portions of the knees must be touching the ground.
- Rest the upturned right palm on the central portion of the interlocked legs just below your navel.
- Keep your back (spine), head and neck absolutely straight.
- Stay in this posture till you feel uncomfortable. With practice you’ll be able to sit for hours in the Padmasana.
- You should be in perfect ease with yourself.
Points to Remember
- Draw the feet close so that your heels slightly press the lower abdomen.
- The footlock must be tight.
- The legs must be symmetrically crossed.
- Never lift the knees during the posture.
- Though in the beginning only the knee of your lower leg touches the floor, yet with practice you will be able to make the knee of your other leg also touch the ground as you sit in Padmasana.
- The knees placed firmly on the ground provides stability.
- If the knees rise, use the palms to press them down gently without straining yourself.
- Don’t use force to make the knees touch the floor.
- Do not lean back while folding the legs.
- The soles should be akin to the petals of a full-blown lotus.
- Keep the tip of your tongue in between the two front rows of your teeth.
- Maintain this position as long as you do the Padmasana and also during the concentration boosting exercise.
- The dedicated practitioner can practise three bandhas while remaining in Padmasana. The bandhas are Jalandhara, Mula and Uddiyana.
Caution Note
- You should not do Padmasaana on a full tummy.
- Similarly, never sit in Padmasana while having meals.
- Proceed cautiously and with prior medical advice, if you suffer from varicose veins or sciatica.
(II) Meditation
The Padmasana is the ideal posture to do meditation.
- While meditating which takes a minimum of three minutes, maintain the normal breathing.
- In that position, close your eyes.
- Concentrate in the middle point of your forehead.
- Think that your navel and nothing else is in that selected point on the forehead.
- Count backwards from 10 to 0.
- As you pronounce ‘zero’, say a fixed keyword. In fact, any short word can be that keyword.
- The moment you state that previously determined keyword, you will reach the ‘Blast Off’ stage.
- The blast-off stage will transport you to a typical world.
- That world will appear totally blank. No thoughts of the mundane world will come before your mind or eyes.
- Remain in this position as long as you are comfortable.
- Now, slowly open your eyes.
- You’ll view the surroundings in a new light! You’d be totally refreshed to begin the controlled breathing exercise.
(III) Breathing (Pranayama) exercises
The Padmasana is very apt to do the breathing exercises.
- Don’t we breathe daily? But, how many times do we try to take over the breathing process. Yoga helps you to be the master of your entire breathing mechanism. You’ll also be able to stop breathing for a few moments. Moreover, these breathing exercises will also enable you to hold on to your breath (after controlled inhalation) and also remain without breath (after exhalation.
- The following breathing exercise will purge your lungs of the toxic materials. The coordinated controlled breathing will also ensure better blood circulation.
- The breathing controlling exercises are divided into three stages. The first stage is that of normal breathing followed by a series of inhalation and exhalation through the pouted mouth. The third stage is a series of six steps of definite controlled breathing exercises through the nostrils, one at a time.
The First Pranayama Stage
- After opening the eyes, place your palms upside down on the respective knees.
- Place the thumbs on the third line of the index fingers. Obviously, the index fingers and the thumbs will remain bent towards each other.
- The other three fingers (middle, ring and little) will remain open and straight.
- Close your eyes and mould your mind to start the breathing exercise.
- Stay in this position for about five seconds. Continue the normal breathing for approximately five seconds.
- Get ready for the second breathing stage after an exhalation stage.
The Second Pranayama Stage
- Slowly take a deep breath. Try to complete the inhalation process in not less than 10 seconds.
- Ensure that you are thinking positive and believing that all your ailments are getting cured through the oxygenated air you are breathing in.
- Hold on to the breath for about five seconds.
- Pout your lips and then open them in an ‘O’ fashion.
- Exhale through the lips. Complete the process in about 15 seconds.
- Don’t inhale immediately. Wait without inhaling for two-three seconds.
- Then again inhale slowly and deeply as mentioned above.
- You can repeat the process three-five times. This forms a cycle.
- After completing the cycle (according to your convenience), relax!
- Continue normal breathing for about five seconds and prepare for the next breathing exercise
The Final Pranayama Stage
Don’t alter the Padmasana posture or the positions of the index fingers and the thumbs as well as the other fingers.
The Mudra
- Keeping the right arms in the same position, arrange the fingers of the left hand in the following manner which is called a ‘Mudra’.
- Bend the index and middle fingers to touch the raised fleshy mound just below the thumb.
- The middle portion of your thumb will be touching the middle side of the bent index finger.
- The ring and small fingers will remain straight. The ring finger will be in close alignment with the bent middle finger. You’ll have to keep your fingers in this fashion till you complete the cycle of three-five times.
Commencing the Third Breathing Stage
- After an exhalation stage, bend your right elbow to your nose.
- Press the side of your right nostril and block it with your thumb.
- Slowly and deeply inhale through the right nostril. Complete the process in about 10 seconds.
- Without breaking the mudra, use the joint ring and small fingers to press the side of the right nostril in order to close it. Hold on to the breath for about five seconds.
- This is that crucial phase when you must think positive and believe that you have within yourself the power to cure all your ailments using the fresh oxygenated air you have just breathed in.
- Hold on to the breath for about five seconds.
- Now lift your right thumb from the right nostril to slowly exhale in about 15 seconds.
- After completing the exhalation, stay put without inhaling for about five seconds.
- Then slowly and deeply breathe in. The inhalation process has to be completed in approximately 10 seconds. This is one stage of a cycle.
- Within the cycle, you can include six such stages.
- The cycle will conclude in an exhalation stage. After that you can resume the normal breathing.
(IV) Concentration Boosting Exercise
Immediately after the breathing exercises, utilize the Padmasana to improve your concentration acumen.
Methodology
- Stay in the same posture. Keep the hands on the knees. Maintain the hands in the mudra of the first breathing exercise.
- Continue your normal breathing.
- To do the concentration boosting exercise, you just need to pinpoint your gaze to the tip of your nose.
- Believe that your concentration power is increasing.
- Remain in this position for 10 seconds.
- You can repeat it twice. But doing it once suffices.
Padmasana Advantages
The Padmasana posture has three types of advantages for the dedicated practitioner, viz., theraupetic, spiritual and physical.
Theraupetical Advantages
- Digestive disorders will be solved.
- Lungs and heart problems will also be cured.
- Breathing complexities will be resolved.
- These benefits arise from the erect posture and the controlled coordinated breathing exercises ingrained in Padmasana.
Spiritual Advantages
- As you have seen, meditating while you are in the Padmasana improves concentration.
- Padmasana has been used by sages down the ages for meditation.
- You will also have peace of mind.
- While doing Padmasana and even after it you will experience a tranquility of mind for the entire day.
- Regular practice of Padmasana and Savasana solve insomnia. You will have sound sleep at night.
- Both Padmasana and after it the Savasana helps to relax the body.
- The breathing (or Pranayama) exercises you do while in Padmasana will cure all breathing ailments.
- Your breathing will be rhythmic.
- This happens as the lungs expand fully during Padmasana. This added to the contraction and expansion of the abdomen as well as the respiratory organs correct the breathing process.
- You will experience an invigorated physique.
- Amidst the tension and rush of the modern world, Padmasana offers you a means to have a balmy effect.
- You will also be able to introspect or look inwards.
- The crossed leg and the erect spine keeps the mind alert.
- As a result, you will get over drowsiness or laziness.
Physical Advantages
- Superfluous flab is reduced especially in the thighs, abdomen and buttocks.
- There is less possibility of the viscera getting compression because you have kep your spine erect in Padmasana.
- Spinal deformities (minor ones) are corrected.
- Your posture will also be corrected.
- The sciatica nerve as well as the spinal sacral and coccygeal regions are corrected.
- All muscles, tendons and ligaments are flexed and extended during Padmasana. They are then relaxed when you relax.
- Padmasana ensures the required supply blood supply to the abdomino-genital and pelvic areas.
- Similarly, the abdomen and spinal lumbar regions get good blood supply. So, the abdominal organs and the spine tones up.
- Your calves and thighs will be strengthened.
- The hamstring muscles will become more elastic.
- Arthritic pain in the ankles, hip joints and knees will be relieved as Padmasana limbers them up.
References:
- Goraksha Samhita: 1-11;
- Shiva Samhita: III—88-91;
- Hatahpradipika: 1-45-50;
- Sandilyopanishad: 1-3
- Darshanopanishad: I-5;
- Yogakundali Upanaishad: 1-5