The Ardha Shalabhasana has been explained in the Gheranda Samhita (II—39) thus: Here the main impetus is on your legs. Eminent sages have named this asana Ardha Shalabhasana as it resembles the locus when it raises its tail and lowers its head to have its meal.
To do this asana, you will have to first lie prone on the ground with your palms lying on either sides of your chest. The palms will have to press the ground even as your feet are raised about 10 inches from the floor.
The Nomenclature
The term ‘Ardha’ in Sanskrit means ‘half’ while ‘Salabha’ refers to locust and ‘asana’ means exercise. Hence, as the nomenclature suggests, a practitioner of Ardha Shalabhasana will have to imitate a locust as it prepares to have its meal by lowering its head and raising its tail. The practitioner will have to raise his/her legs just as a locust raises its legs.
Methodology of Ardha Shalabhasana
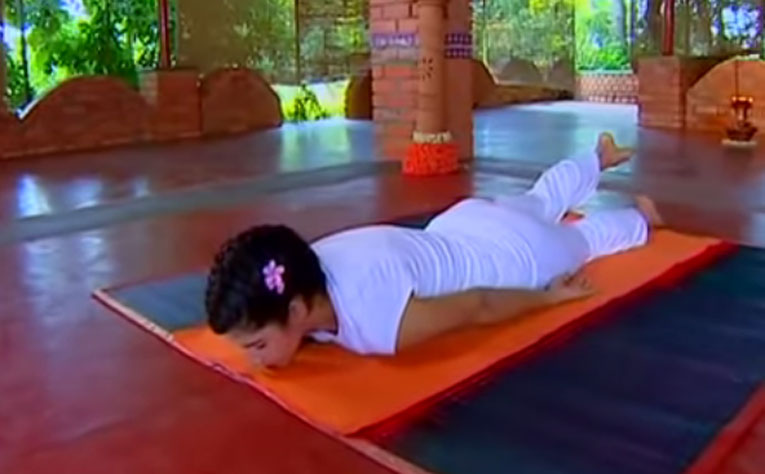
- To commence Ardha Shalabhasana, you will have to first lie flat on the ground with your abdomen, chest and chin touching the ground while your arms lie flat on the ground.
- As you place your fingers on the floor, clench them into fists and keep them upward facing.
- Slowly inhale deeply. Complete the inhalation in about 10 seconds.
- Start exhalation and begin the asana even as you hold on to your breath. The exhalation process should be completed ideally in about 15 seconds.
- Use the fists to balance and also to leverage your body.
- Slowly lift your left leg to the highest level.
- The left leg should be raised from the navel downwards.
- Remember to keep the outstretched legs straight.
- Don’t strain yourself.
- Keep the raised left leg straight at the knee.
- To obviate any possibility of your pelvic region undergoing any twist, press the abdomen on the floor.
- While lifting the leg, contract your lower dorsal muscles along with those in the hips and the spinal lumbar region.
- There must not be any pressure in the hands
- You will experience the pressure of the uplifted left leg on your chest, chin, wrists and the clenched fists.
- The clenched fists must neither be too tight nor too loose.
- You will experience the pressure of the uplifted left leg on your chest, chin, wrists and the clenched fists.
- Concentrate on the lower vertebrae and the pelvis.
- Don’t move your right leg. Keep it steady and straight.
- The toes must be stretched out.
- Exhale slowly.
- Even as you exhale, lower the left leg but don’t bend the knees.
- Complete the exhalation and the leg lowering act in approximately 15 seconds.
- Hold your breath as you exhale totally.
- Breathe normally for about 15 seconds.
- Repeat the movement with the right leg as you inhale.
- When you commence the asana with the right leg, don’t shift the body weight towards the outstretched leg side.
- When you do the Ardha Shalabhasana with both the legs, you complete one cycle.
- You can do three cycles.
- After the third cycle, loosen the fists.
- Breathe deeply for some time so that your respiration pace resumes the normal stage.
- Finally, relax in Savasana.