The Srikrishnavalllabhacharya (P-250) in Yogashastra: Kirana Tika and the Jyotsna on Hathapradipika (III-79) encapsulates Sarvangasana yoga in its entirety.
Sarvangasana yoga requires the involvement of the entire body and also the mental faculties which involves three stages.
The counter pose of Sarvangasana yoga is the Matsyasana. To derive the optimum benefits, one must follow up Sarvangasana yoga with Matsyasana and must be preceded by Halasana.
While Matsyasana releases the sinews in the abdominal and dorsal portions, Sarvangasana yoga requires also these muscles to be deeply involved while carrying out the posture.
Sarvangasana is the alternative asana for the practitioners who cannot do Sirsasana. Nonetheless, even those people who have mastery over Sirsasana should also practise Sarvangasana. In fact, Sarvangasana has all the benefits of Sirsasana and more without having any of the side effects that Sirsasana may have on some people.
Sarvangasana can be linked to Viparit Karani by the experienced yogic practitioners. Besides, if one gains experrise in Viparit Karani, then it becomes quite easier to perform Sarvangasana. Moreover, it is a smooth transition from the Viparit Karani posture to Sarvangasana.
Sarvangasana has immense therapeutical and physical advantages for the dedicated practitioner.
NOMENCLATURE
This Sanskrit nomenclature ‘Sarvangasana’ is made up of the three terms ‘Sarva’, ‘Anga’ and ‘Asana’. ‘Sarva connotes ‘all’, ‘Anga’ means ‘portion’ and ‘Asana’ refers to the yogic posture. Therefore, ‘Sarvangasana’ means that yogic posture where the entire body is exercised.
CAUTION NOTES
- It is not for those people who may high blood pressure.
- It is also not recommended for people having serious cardiovascular disorders.
- It must not be practiced during pregnancy and menstruation. During menstruation, the body releases acidic blood and its back flow may adversely affect the womb.
- If you experience dizziness or palpitation while practicing, don’t carry on the posture.
- It is not for people having eye troubles.
- It should be practiced only if you are above 15 years of age.
- Don’t practice Sarvangasana if you have any thyroid disorder or are suffering from cold or your nostrils are blocked.
IMPORTANT POINTS TO REMEMBER
- It is most ideal for people who are in their middle ages (beyond 40 years of age).
- It can be daily practiced by anyone who has a sound constitution.
- It rejuvenates the mind and the body.
- It also boosts concentration.
- First memorize and gain expertise for a smooth transition from one stage of Sarvangasana to the later stage. It only after this important phase should you practice the controlled breathing strategies.
- Sarvangasana should be practiced only thrice a day and not more.
- Each posture should be held on to for approximately 25 seconds.
- Gradually increase the holding-on time by five seconds. You will be able to remain in the posture up to three minutes at one go. This is the limit when you are doing other asanas as well.
- As you gain expertise, you can practice Sarvangasana just once with a longer holding-on period.

SARVANGASANA, MATSYASANA & HALASANA
- To get the maximum benefits perform Matsyasana and Halasana immediately after Sarvangasana.
- Regular practice of these three asanas (one after the other) guarantees good health.
- Actually, Matsyasana is the counter pose of Sarvangasana. Matsyasana frees the neck front (unlike Sarvangasana) while compressing the nape.
- Moreover, Matsyasana relaxes the abdominal and dorsal muscles while Sarvangasana requires pressure to be put on those sinews.
- Though one may be a regularly practising Sirsasana, yet one should also practise Sarvangasana as the latter has many more advantages for the regular practitioner.
- What is more Sarvangasana is easier than and also an ideal alternative to Sirsasana.
- Keep
BREATHING RHYTHM
You should be having the normal breathing rhythm throughout the posture.
Subsequently, you can integrate the controlled breathing sequences as would be explained in the following sections.
Never quicken the breathing pace while pressure is being exerted in the thorax as you hold on to the posture.
Sarvangasana does not at all require the retention of breath.
METHODOLOGY
There are four stages, viz., the common points, the starting pose, the absolute posture and the returning stage .
The absolute posture is again divided into relevant sub-sections so that you can concentrate on how to keep the different parts of your body while maintaining the balance and also during the actual Sarvangasana stage.
Let’s analyze each stage.

The Common Points
- Perform Sarvangasana yoga only on an empty tummy.
- Ensure that you have had a regular bowel movement.
- You must have emptied your bladder prior to beginning Sarvangasana.
- Don’t sneeze or cough while you are in the posture or doing the movements.
- During the entire course of the posture your head must be resting on the mat.
- While performing Sarvangasana, you should be in your normal self.
- While remaining in the chin-lock period, don’t gulp saliva.
- Do the Sarvangasana movements slowly and in a relaxed manner.
- You must have complete control over the Sarvangasana movements.
- Sarvangasana should not be done in haste or with jerks and jolts.
- Don’t separate the legs.
- Keep the heels and toes together.
- Don’t keep your toes pointed.
- Keep the knees straight and not bent.
- During the chin-lock period, never gulp down saliva.
- You should be practising Sarvangasana in a relaxed and a slow manner.
- Avoid jolts and jerks.
- Have complete control over the Sarvangasana movements.
- Your head must always remain on the mat.
- You should not be bending your knees.
- The movements must naturally flow. There must be a continuity of the movements.
- Keep your feet relaxed.
- Your toes must not be pointed.
- Keep your heels and the toes together.
The Starting Pose
- Gradually raise your legs without straining yourself.
- Raise your legs by pressing down the palms on the floor.
- Simultaneously put pressure on your back. This will facilitate your leg lifting effort.
- As you raise the legs, don’t make your legs stiff.
- This steady and slow movement should flow into the final movement subsequently.
- For the chin-lock, use your hands to push your trunk with the hands and move it towards the head.
- Then endeavor to bring the upper portion of the chest towards your chin and not vice versa. In other words, you should not make the chin touch the chest but the chest touch the chin.
- Moreover, don’t lift your head for the chin-lock.
- Maintain this position for five seconds.
- The height should be at a comfortable level.
- While maintaining the position, see that your thyroid region gets pressed. This can be done by pressing the upper chest to the chin.
- Slowly bring down (don’t drop) the legs to the floor.
- The obese practitioners and the novices may find it tough to lift their legs by putting pressure on their backs.
They can do the action by using their palms to balance the act.
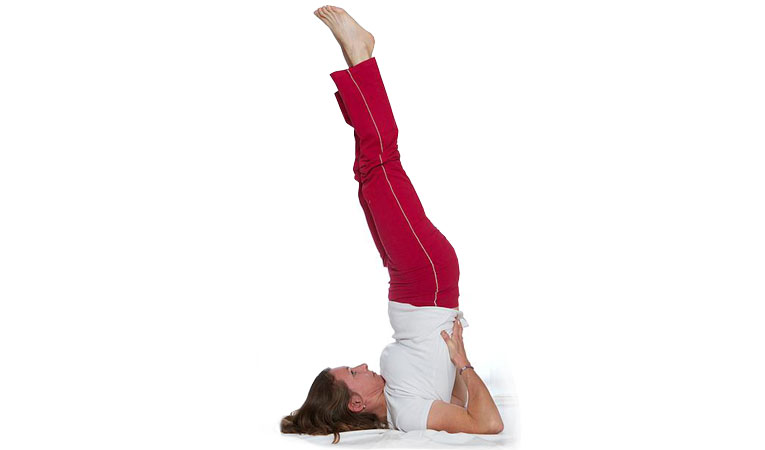
The Absolute Posture
- This will be the final position in Sarvangasana.
- Depending on your physique, there are different ways of maintaining this posture.
- For instance, a person of average (normal) build will have to keep the neck and head at 90 degrees (right angle) to the trunk as well as the legs.
- Above all, these practitioners will have to keep their legs and trunk perpendicular to the ground. The trunk and the legs must be in a straight line. And, there must not be any angle at the hipline.
- On the other hand, a person having bulges (especially in the abdominal region and/or on the sides) can slightly incline their legs over their heads. This will help them to maintain the posture without any strain on the any part of the body.
- Sarvangasana requires that you keep your shoulders, the back portion of your head and the upper arms till the elbows on the ground.
The Palms Position
Support your trunk only on your palms at the initial stage.
Your palms should be lightly holding your trunk. This will aid the balancing act.
Ensure that the palms do not slip while holding the trunk. Else your body will slant sideways.
The Elbows Position
Gradually shift a portion of the upturned trunk and body to your elbows and shoulders.
The elbows should be neither away nor very near from the sides of your body.
You will not be able to properly lift the trunk if the elbows are positioned in spots that keep them wider than your shoulder length.
The elbows alone should be carrying too much of your body weight.
Actually, your shoulders and elbows should be equally sharing the body weight along with the palms.
The Legs Position
Don’t move the legs towards your head as you support your trunk lightly on your palms.
At this stage, keep the legs just in the perpendicular position and gain the balance.
A common problem faced at this stage that your legs will tend to shift from the perpendicular position.
Control this tendency by tightening your thigh and knee muscles. Stretch vertically the thighs and knees. At the same time, press your back with the palms.
The Sarvangasana posture should be maintained by keeping your legs straight but not at all tense.
Your toes and heels should be kept close together.
The Final Position
- As you maintain the final Sarvangasana stage, your toes must be just above your eyes.
- The toes should be kept relaxed and turned outwards.
- If you keep the toes stiff or stretch the feet you will experience strain on your knees, feet and legs.
- Don’t put pressure on your neck. Keep it straight, though.
- Your neck must not be moved sideways during the final posture. Or you will experience pain on the neck.
- Now try the chin lock – the most important part of Sarvangasana.
The Chin Lock
The most significant aspect of Sarvangasana is the chin-lock. It is done by pressing the upper portion of your chest against the chin.
The chin-lock adequately massages the thyroid. There is an augmented supply of oxygenated blood into the thyroid during the chin-lock position.
If you fail to press your chin against the jugular notch then press your chin against the nearest and any comfortable part of the sternum. However, you derive fewer benefits this way. So as you continue practising, endeavor to place your chin only in the jugular notch. Slowly but surely you will succeed.
The Finishing Touches
- As you do the chin-lock and stay put in the position, don’t allow the body to move to-and-fro.
- Without any discomfort, maintain the balance and have control over the entire body so that it remains still.
- The entire body must be fully stretched.
- However, if your legs start shaking, slowly return to the starting stage and relax for some time.
- You can give your eyes the much-needed exercise at this stage by doing the eye exercises.
The Eye Exercise
- Without shaking your head just roll your eyeballs first to your extreme right.
- Look at a figure or an object located at the highest point to your right.
- Gradually roll both the eyeballs in an anti-clockwise direction to the extreme left corner at the highest point.
- Then slowly roll the eyeballs from the left and bring them downwards and complete the cycle as you bring the eyeballs to the starting position.
- Now repeat the eyeball movements in a clockwise direction.
- After you complete the clockwise cycle in exactly the same way but in an opposite direction as described above (with reference to the anti-clockwise movement), simply close your eyes for three seconds.
- Tightly close the eyes and open them wide. Do this thrice.
- This completes the eye exercise.
The Returning Stage
- While returning to the starting stage, use your abdominal muscles to the optimum.
- Return slowly, gracefully and by having full control over your body balance.
- The returning movements must be controlled. You can have this balance by pressing your hands to the ground while you do the downward movement of the legs, and trunk.
- Uncoil your spine onto the ground very slowly.
- Don’t drop your legs.
- Be very conscious that your back, posterior and the tailbone do not drop suddenly on the ground.
- As your legs approach the ground, don’t lift your shoulders or your head from the ground.
- The neck nape must stay firm on the floor.
- The novice practitioners can balance their legs during the downward movement by putting their palms on their posteriors.
- Don’t immediately raise from the floor or proceed to any forward inverted position.
- Relax in Savasana.
- Allow your blood circulation and breathing to assume their normal rhythm.
The palms will have to slowly slide downwards along the back of the thighs till the back reaches the floor.
ADVANTAGES
Here are the lists of the therapeutical and physical advantages arising from regular practice of Sarvangasana.
Therapeutical Advantages
- Sarvangasana rejuvenates the physique even though one may have suffered illness for a long time.
- Exhaustion and nervous fatigue are also counteracted.
- Sarvangasana also cures leprosy.
- Hernia is prevented.
- One also gets relief in cases of urinary disorders and piles.
- Sexual dysfunctions are rectified.
- Sarvangasana keeps the ovaries and the gonads activated.
- One can regain their lost sexual drive.
- The regular practitioner of Sarvangasana has better control over one’s sexual drives or urges.
- Uterine and menstrual problems are cured.
- Prolapse of the uterus and the rectum as well as displacement of the abdominal organs are rectified.
- The inverted position of Sarvangasana yoga is beneficial for women.
- Sarvangasana yoga can be practised by women who have had successful normal pregnancy. They should take to Sarvangasana about seven-eight months after bearing the child.
- Sarvangasana brings back glands and organs of women to their original positions especially after they undergo motherhood.
- However, women having caesarean operations should practise Sarvangasana only after their abdominal and other stitches get cured. Such women must also seek consultation from experts prior to exercising.
- Sarvangasana yoga provides relief from and even prevents varicose veins especially in the legs. This is possible as the asana drains the accumulated blood from such affected areas.
- Goitre is prevented.
- One can enjoy the advantages accruing from regular practise of Sarvangasana if one is suffering from disorders of the bladder, liver and the spleen besides any of the following ailments: gastritis, constipation, dyspepsia, enteroptosis, visceroptosis, insomnia, tonsillitis, epilepsy, tuberculosis, chronic headache, bronchitis and palpitation.
Physical
- Muscles get strengthened.
- The thighs, neck, neck, shoulders and the upper arms become stronger.
- Sarvangasana yoga has positive effects on the thyroid and the parathyroid glands.
- Functioning of other glands (the prostate, thymus and pituitary) are also regulated.
- Healthy thyroid negates the possibility of nervous tension.
- The metabolic process of the body is stabilized.
- Your weight will be regulated.
- Excess flab in different portions of the body is reduced.
- This posture is especially effective in cutting down fat on the thighs, abdomen and the pelvic region.
- Sarvangasana is most ideal for people engaged in sedentary occupations.
- Your posture will be rectified.
- Sarvangasana yoga exercises the legs.
- Sarvangasana yoga is also a good exercise for the eyes.
- The regular practitioner of Sarvangasana provides effective massages to all the organs of the throat including the pharynx and the larynx.
- The voice gets enriched.
- This asana boosts the functioning of the vocal cords as well as the throat vessels.
- Breast sagging is prevented.
- Liver and kidneys function better.
- Congestion of organs in the lower portion of the body (the pelvis and the abdomen) is relieved.
- Pancreatic and digestive secretion is improved due to the inversion of the body.
- The vertebral column remains flexible.
- The spinal nerves are toned up.
- Stiff spines are made pliable.
- Minor spinal curvatures are rectified.
- Sarvangasana yoga is good for the heart.
- This asana facilitates an augmented flow of blood to the head, neck and the thorax.
- This is done during the inverted position when there is reversal of the gravitational pull on the flow of blood.
- Circulatory congestions are relieved.
- Free flow of hormones is ensured to the blood stream.
- Premature wrinkling of the skin and aging is arrested.